Saturday, October 17, 2009

Ugly engine and starting some bodywork

After I pulled the engine out of the donor, it got pushed to a corner of the garage and I really hadn't looked at it since then.

Well, it was time to drag it back out and take a good look at it and start cleaning.

I'd forgotten how bad it looked...

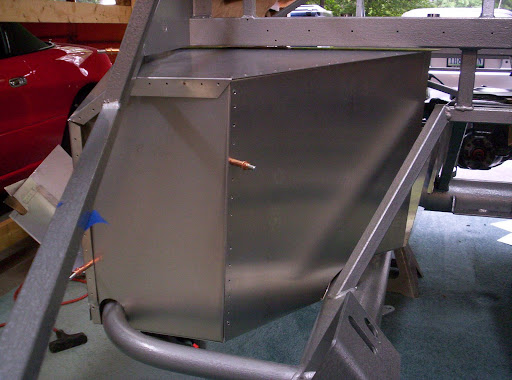
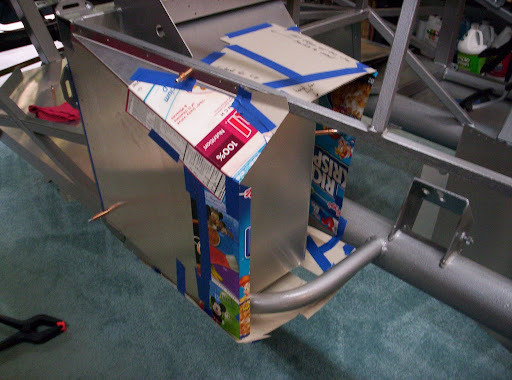
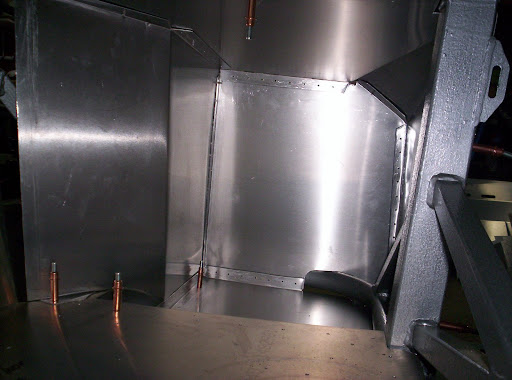
(Oh, click on the pictures for full size. I don't know why the previews are always cut off here, but they are.)


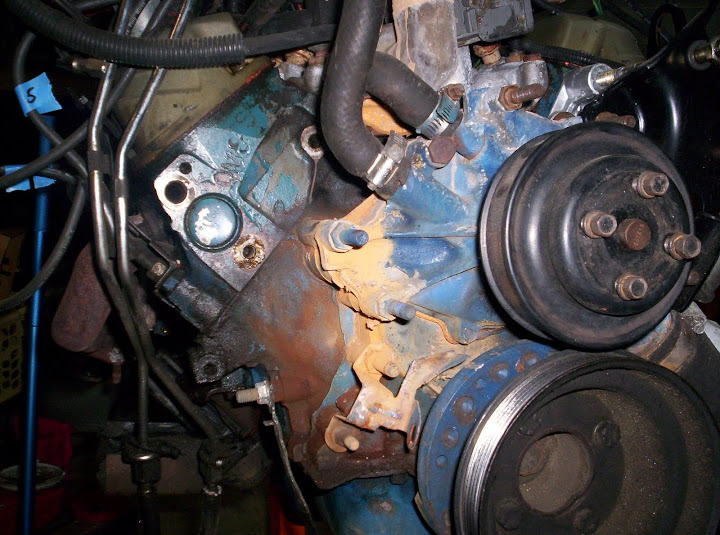
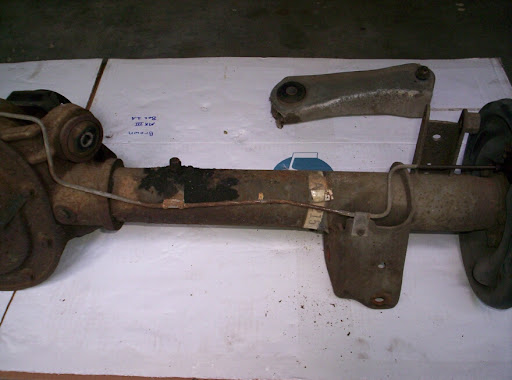
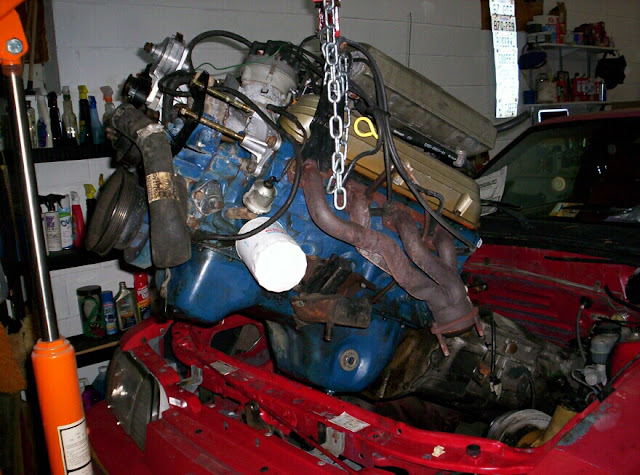
Pretty bad actually. And take a look at the motor mounts.


They're in great shape, eh?

Luckily I have a set of Energy Suspension poly mounts to replace those once everything gets cleaned and pretty again.

Since I can't put in something that ugly, I decided to do something about it. I spent some time on the internet and a few days later I got home to find this waiting on my porch.


Now what could be in those boxes? Hmmm. You'll have to wait to find out.

My wife has been promising to help me with this project all along but she really doesn't enjoy mechanical work. Despite that she helped me pull the engine and transmission a while back.

But what she does enjoy is bodywork. So we pulled the body shell off of the tall storage body buck and got it to working level for her. Then she went to work sanding the gelcoat seams. They're going to take some work to get completely cleaned out and ready for HSRF but not nearly as bad as others of which I've seen pictures.


After that it started raining. Of course...

If you look closely behind her, you'll see her project car that gets started when we finish the Roadster. It's a 1965 Rambler Marlin with a fire-breathing 232 CID straight six engine and automatic transmission.

Here's a picture of the car from the ad where we bought it.

Friday, September 18, 2009

Aaaand I'm back!

And still wiring!

I replaced my dead HP PC with a new iMac24. The screen size is somewhat overwhelming but at least I don't have to squint any more.

Wiring continues. I've got the fusebox mounted and all of the lights working. I also wired in the electric fuel pump although that won't be used as it turns out. I'm changing to a mechanical fuel pump instead. So I've got an extra wire running to the back that I can use for whatever I need - backup light maybe?

Now for a few pictures.

Ugly wiring.


More ugly wires.


Temporary test dashboard.


The fuse box hanging via clamp while hooking up wires.


The rolling chassis on temp wheels with wiring pigtails installed.

I decided to go against common wisdom and use wiring connectors from Breeze Automotive instead of weatherpak connectors. As it turns out, the Breeze wiring kit is trailer wiring but it also includes excellent directions, weatherseal shrink wrap, wire loom, crimp connectors for grounding all of the circuits, and even grounding bolts. It's somewhat less expensive than the weatherpak kits and you don't need a special crimp tool to install the connectors.

I soldered and shrink-wrapped all of the connections with no problems at all. Well, maybe just one.

The rear lights were a challenge until I sat down and just figured it out. I have running lights on all four lights. The upper lights will be brakes and the lowers will be turn signals. The challenge was how to use the Breeze connectors and hook both sets of running lights together since the three-wire connectors don't really make any allowance for that. I ended up connecting the "dim" filament wires together from both pigtails and then connecting those to the running light feed wire. It sounds simple but I did some headscratching to figure out the best way to connect everything. As usual, the second side looks much better than the first, but they all work and I'm happy.

Sunday, August 30, 2009

Wiring and other stuff

I'm working on wiring now. Originally I was planning to use the Mustang wiring and diet out the stuff I didn't need. But when I started looking at the wires in detail I found a few crispy ones and decided I really didn't want to see my car burn up from an electrical short.

So, I bought the American Autowire Highway 15 kit. It's a generic wiring kit for Street Rods but will work fine for my build as well.

I've got the fusebox located and all of the lights are functioning except the 4-way flashers but I've about got that licked too.

Once that's all in, I plan to clean up the engine and drop it in.

In other news, there are no pictures yet because my primary computer died. You know, the one that had EVERYTHING on it. I'm hoping the hard drive is salvageable but I haven't had a chance to work on it yet.

So anyway, that's the latest news. Sorry it's been so long between posts.

Monday, July 27, 2009

Parts Score!

We hit the junkyard last weekend. I scored a Fiero emergency brake handle and a right-angle oil filter adapter.

The e-brake handle will let me mount it next to the drivers seat on the floor, rather than putting it on the center transmission hump.

And the oil filter adapter means I don't have to run the (typically leaky) remote oil filter.

All for less than $20!

I love junkyarding.

Brake lines finished.

All of the brake - both hard and flexible - lines are now in place. The connections were tightened, brake fluid added, and brake bleeding commenced. Several connections were then RE-tightened to stem the dripping brake fluid. Overall it was a success though - nothing had to be reflared. I did have to remount the front flexible line mounts though - the original orientation would have caused too much bind when the wheels were at full up-travel.


So now the car will stop! It won't go yet, but that's a minor point.

I also got the fuel lines run. I'm really happy with the way they turned out by the fuel tank. I HATE the FFR clamps though - they're really cheap and the rubber peels off of them too easily.


But those are also in place for now. I have to figure out where they'll go in the engine bay but I can't do that until I drop in the engine and see where they have to connect.

Cindy riveted in both floorpans and then I put the modified passenger footbox together. I have one panel left to go but I want to add some rivets to the foot pan first and it's easier to do without the outer panel in place.

Friday, July 10, 2009

Passenger footbox expanded

One major complaint that many FFR owners share is that the passenger footbox is too small. It's substantially smaller than the drivers footbox for no (to me and many others) apparent reason. When I rode in the passenger side of an FFR at the London Cobra Show recently, this fact was reinforced. I had to twist my feet uncomfortably to make them fit.

There are a couple of commercial solutions available, but with some new jigsaw blades and a brand new Harbor Freight metal break in my possession, I wanted to try my hand at building my own.

The stock box looks like this.


See how the inside wall angles in? That really cuts into the available footroom. Here's an overhead shot of the same box.


And here's an inside shot.


I used my best quality high-end modeling materials (pizza and cereal boxes) to redesign the footbox panels.


And this is what I ended up with.


Notice how much larger the front of the footbox is compared to the stock one. This equates to a tremendous increase in footroom.


And an inside shot.


I'm happy with how it turned out. The panels could fit together a bit better but I'm going to seal the gaps with aluminum tape and silicone to weatherproof them.

And my wife is much happier now that her feet will fit more comfortably.

Friday, June 19, 2009

I haz a roller!

I have achieved rolling chassis status, aka a roller!

I don't have the proper wheels and tires yet so I 'borrowed' the autocross set that I use on my Miata.


Almost immediately after pushing the car outside for these pictures, it started to rain. So it went right back into the garage.

It's going back on jackstands tonight and I'm hoping to start running brake lines. Also I need the autocross tires for Sunday.

Thursday, June 11, 2009

Latest achievements

The rear axle assembly has been removed from the Mustang and it has been cleaned and painted.

Lots of scum and residue around the vent.


Cleaned up a bit.


The drum brakes and 4-lug axles have been removed.

The disc brake mounting brackets from North Racecars have been painted and installed.

The five-lug axle shafts have been installed.

The 3-link rear suspension has been installed and the axle is mounted in the frame.


WHEW!

Thursday, May 28, 2009

I'm finally starting to build!

The gas tank and straps have been cleaned and painted. The plastic cover cleaned up really well, so I'm going to leave it alone. The sending unit tests okay so I'm hoping it will work with whatever gauges I end up with in the car. I'm going to cut an access opening in the trunk regardless so even if it goes out I don't have to drop the tank to swap it.

And I'm finally starting to put some things together!

The donor isn't completely stripped but I'm tired of fighting dirty parts for a while.

I've cleaned up and painted the stuff for the front end so I decided to put it together.

First up was an upper control arm. I installed the ball joint as per the instructions but used some lock-tite on it rather than tack welding it in place. I also marked it so I can tell if it turns.

Then, with some bubble wrap around the frame to protect it, I bolted the arm into place.


After that I put on the lower control arm, spindle adapter and spindle.


With the help of my trusty assistant Flash, I installed the KONI coilover shock assembly and brake disc and caliper.


Then it was lather, rinse and repeat for the other side.


Back to the dirty, nasty parts, I pulled the steering rack out of the Mustang. It was, like everything else, nasty.


I scrubbed it with Simple Green and then wiped it down with Acetone. A coating of Hammered Black paint followed for the body while the lines got cleaned and sprayed with silver. I didn't get a picture of it before I installed it but it looks really nice. I installed Energy Suspension mount bushings and then installed the rack into the frame. Then I put in the FFR rack spacers and reinstalled the inner tie rods. I'm waiting for the rack boots to dry and then I can install the tie rod ends.

Here's a shot of it painted up and installed.


While I was at it, I installed the steering column and placed the steering wheel on for a picture.


And thus endeth Box 1.

Friday, May 8, 2009

The gas tank is out!

And I didn't even blow up myself or my garage. :-D

Overall it was fairly uneventful even though the mounting strap bolts were pretty corroded.

I used a jack with a piece of wood on it to support the tank while I removed the strap bolts. Once those were out I dropped the tank down a bit and disconnected the fill tube. With that out, there was enough slack in the hoses to set the tank on the ground. Of course it shifted but I only spilled about a cup of gas.

Ford uses special fittings on the gas lines and the method for disconnecting them is not terribly obvious - especially when you're working upside-down under the car. Once I got the tank on the ground, I could get a clear look at them and see how they worked.

So, everything got disconnected and I took the tank outside to drain it. Important point here - make sure it's as empty as possible before beginning this whole operation. My tank had about 2.5 gallons left in it and it sloshed around no matter how carefully I carried it.

I put an empty gas can on the ground and bungee-corded a funnel to it. I had my son hold a light (this was 9:30 at night, of course) so I could "see" what I was doing and I proceeded to aim the tank discharge at the funnel.

That didn't work too well.

Gas still splashed everywhere. I'm glad I put down plastic and rags to catch it before beginning. So, my son got another, smaller funnel and held it against the tank to minimize splashing and we pointed that one at the funnel stuck to the gas can.

Success! Mostly.

We still spilled a bit but it worked a lot better this way. I'd say we got 98% of the gas into the can and the remaining spills got soaked up by the carefully positioned rags surrounding the can.

I wiped the spillage off of the gas can and set it to the side. Then I picked up all of the gas soaked rags to dispose of safely.

Feeling happy with a job well-done, I walked back into the garage and was treated to the sight and smell of a large pool of gasoline under the car. It seems that by removing the tank, there was no longer any sort of vacuum holding the gas in the lines, and despite my carefully placed bolts-in-the-rubber-fuel-lines, they leaked.

Cat litter was rapidly and liberally tossed about on the pool of gas. It soaked up the spill quickly and was swept up and set outside. Momentarily I considered seeing if gas-soaked cat litter would burn, but it was late and I figured I'd done enough dumb things for the night.

So now I have to clean and paint the tank, cover and mounting straps. I also need to test the sending unit since the gauge in the car never worked.

But I'm getting ever-so-closer to being finished with the donor and then I can finally start building my car.

Here's the dirty tank picture.


It's just getting cleaned, de-rusted and painted black. No-one will see it after it's installed so I don't see any point in putting a lot of effort into it.

Here's the tank after cleanup and paint.


And here it is installed in the chassis.


And lastly, the fuel filter mount cleaned, painted and installed.

Thursday, May 7, 2009

Wiring is out.

I finished removing the wiring harness. This entails pretty much stripping the interior completely. Since the Mustang is either going to salvage or become a racer when I'm finished, I didn't bother with removing the nasty carpet to get to the wiring. My razor knife did a quick job of hacking through it and this made the job a lot easier.

But man, there's a lot of wiring behind the dash. There's this huge knot of sticky-goo covered wires that feed all manner of mystery boxes back there.

Thankfully it's all out now and I get to look forward to the thrill of dieting the harness later to remove all of the circuits I don't need. For now though, all of the separate harnesses will be plugged together and I'll roll it up and store it somewhere until I need it. That is, unless I wimp out and go with a newer, simpler generic harness from somewhere.

Next up, fuel tank and line removal. Then I can drag the carcass out to its final resting spot and remove the steering rack, lower control arms and rear axle.

Saturday, May 2, 2009

BWAAAHAAAHAAAAAA!!!


Nothing better than an evil laugh when something works out according to plan.

The engine and transmission are OUT! My lovely bride and I spend some quality time on Friday night and got them out.

I had most everything unhooked before she came out but she still spotted a couple of things I missed.

Then we attached the new Harbor Freight engine leveler and raised it slightly.


A few more checks to make sure it was free and up it went some more.


A bit of persuasion with a breaker bar and it came clear of the radiator support. And then it was out!


Here I am after a successful operation separating the engine from the transmission.


And the bare engine bay. I'll get the steering pump and rack out soon but it was easier to leave them in for now.


Today I got the clutch and flywheel removed and mounted the engine on the stand for cleanup and storage. I also cleaned the 20+ years of scum off of the transmission. Surprisingly the rear main seal on the engine isn't leaking - all of the oil drippage appears to have come from the valve covers.

The PCV screen appears to be plugged solid so that probably contributed to the leaks as well. That will be replaced when I install the Explorer intake anyway so I'm not too worried about it.

That's about it for now. Sunday should see me finish removing the wiring harness and I may have time to drop out the gas tank.

Wednesday, April 29, 2009

Donor teardown started

I got the second coat of paint on the frame and it's been drying for a few days. It's supposed to cure for 14 days so I've moved Morton the donor Mustang into the garage to begin the teardown.

BTW, here are a couple of pictures of the trusty steed since I never posted any previously.


Before I brought it inside I did a radiator flush. While running the engine to circulate the flush, the car finally ran out of gas. Let me explain - the gas gauge has not worked since I got the car and I had no idea of how much gas was in the tank or what the driving range was. I'd been cruising around in the car the night before so I guess I'm lucky it didn't run out then. After adding about 3/4 gallon of gas, it started right up and I finished the radiator flush and backed it into the garage.

I collected all of the antifreeze and flushed goo into plastic bottles and hauled them to the hazardous waste area at the local dump. This allowed the engine plenty of time to cool.

Upon returning I started as per the FFR manual and removed the radiator and fan. The manual then says to remove the steering rack.


I'm looking into the engine bay and wondering why I should fight my way around and under the engine to get to the steering when the engine will be coming out later anyway. So, as is my habit, I skipped ahead in the manual and started working on the wiring harnesses instead.

I never realized just how much wire was in a car. I've got the ECU out and the engine harness removed from under the dash but it's all still connected to the engine. At this point I don't see a need to unwire everything.

The front light harness is completely out. The rear light harness is mostly out to where it goes along the rocker panel. To get to this point, most of the rear interior has been loosened, removed and carelessly tossed back inside. :-D

Here's what the inside of the hatch looks like right now.


I still have to remove the front seats and dash to get that wiring out but that should be about it.

My lovely bride has said she's going to help me pull the engine on Friday night. That will be a MAJOR step in the right direction. Once that's out, I can loosen all of the connections for the lower front control arms and rear axle and then move the car outside to it's final resting place before I strip them out. I haven't figured out how to move it with no wheels so that's why the final dis-assembly will happen outside.

Where I live, I'm allowed one inoperable car on my property and the Mustang will be it. To try to minimize the impact on home values, it will be stored behind another car and covered in tarps. Once the FFR is complete and titled, I can get rid of the carcass, but I've heard horror stories of titling hassles if the Police Inspector can't examine the donor vehicle. I just don't want to take a chance so I'll keep it for a while. Maybe I'll put up some fence to hide it.

So that's it for this update. Hopefully I'll have pictures of the engine and transmission out by this weekend.